
FM-1 + D MINI with MidiPipe
One USB keyboard, seven synth parts plus drums and an external Behringer D MINI. The Mac routes MIDI; D MINI plays track 1, while tracks 2–7 and drums use the FM-1’s internal sounds.
Piterfly 1.1.0. This setup uses a Mac as the USB host and MIDI router. The release has been tested on the physical FM-1 and accepted by the project owner.
1. Connect all three devices to the Mac
Use three separate USB data cables, directly into the Mac or through a USB hub that supports data. The Mac is the USB host.
Keyboard
External USB MIDI keyboard
FM-1
MIDI port: piterfly
D MINI
USB MIDI connection
Mac
MidiPipe
Three devices
One USB host
Piterfly 1.1.0 appears as piterfly in the MIDI input and output lists. Select that port for the FM-1 in MidiPipe.
2. Connect the audio outputs separately
FM-1 audio
Internal synth parts 2–7 and drums
D MINI audio
External sound for track 1
Mixer / interface
Speakers or headphones
MIDI tells D MINI which notes to play. Hear its sound from its own audio output, alongside the FM-1’s audio.
3. Put these four tools in one MyPipe
MyPipe is the name of your routing chain in MidiPipe. See the official MidiPipe documentation and downloads (SubtleSoft) for the program’s tools and help.
Keep both connections in the same MyPipe. In the right-hand Pipes column, arrange the tools from top to bottom as shown.
MyPipe
Select each tool and choose its MIDI Input or MIDI Output port.
- MIDI InYour USB keyboardMIDI Input: the keyboard’s actual port name
- MIDI OutpiterflyMIDI Output: FM-1
Pass Through: OFF - MIDI InpiterflyMIDI Input: FM-1
- MIDI OutD MINIMIDI Output: the external synth
- Select the first MIDI In. Set MIDI Input to your external keyboard.
- Select the first MIDI Out. Set MIDI Output to piterfly and turn Pass Through OFF. Keyboard messages are delivered to FM-1 and stop continuing through that part of MyPipe.
- Select the second MIDI In. Set MIDI Input to piterfly; this receives messages that FM-1 actually sends.
- Select the second MIDI Out. Set MIDI Output to D MINI.
- Remove redundant Channel Router and Channel Filter tools from this main setup. The channels stay 1–7→1–7, 10→10.
- Use File → Save and keep MidiPipe running while using the setup.
Two different “through” settings: MidiPipe’s Pass Through OFF stops a message continuing to later tools after the first MIDI Out. The piterfly GLO → MIDI THRU switch controls whether FM-1 sends received notes back out. These settings do different jobs.
4. Keep the MIDI channels unchanged
| FM-1 track | MIDI in → out | Sound |
|---|---|---|
| Track 1 | 1 → 1 | Behringer D MINI |
| Track 2 | 2 → 2 | FM-1 internal synth |
| Track 3 | 3 → 3 | FM-1 internal synth |
| Track 4 | 4 → 4 | FM-1 internal synth |
| Track 5 | 5 → 5 | FM-1 internal synth |
| Track 6 | 6 → 6 | FM-1 internal synth |
| Track 7 | 7 → 7 | FM-1 internal synth |
| Track 8 | 10 → 10 | FM-1 drums |
Choose the instrument by changing the keyboard’s transmit channel. Selecting a different track on the FM-1 screen does not change the external keyboard’s channel. This recipe uses IN = NOTES, with fixed track assignments.
Assign the MIDI channels
GLO → MIDI
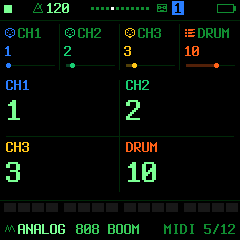
Receive notes and send the sequencer
GLO → MIDI 2
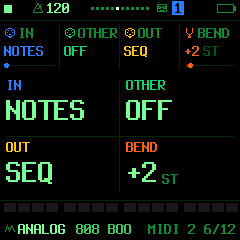
Let D MINI provide track 1’s sound
HOME → Track 1
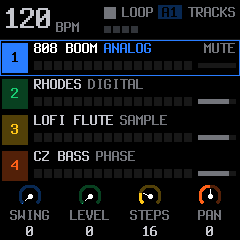
On D MINI: set its MIDI receive channel to 1 only, connect its audio output to your listening setup, and use channels 2–7 and 10 for the remaining parts. MidiPipe can then send all FM-1 output channels to it without a channel filter in the main pipe.
These are renders of piterfly’s actual UI. The common MIDI settings also describe the original SLOOP setup; the MIDI THRU page shown below is a piterfly addition.
5. Live keyboard with piterfly MIDI THRU
The current piterfly firmware adds per-track forwarding for the channel assignments above. With that build installed, turn TRK1 ON on GLO → MIDI THRU to send received track 1 notes back to USB MIDI OUT. The second MidiPipe input then receives them and sends them to D MINI.
GLO → MIDI THRU
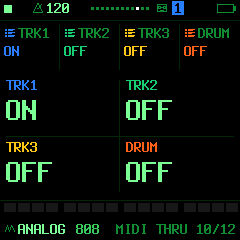
Keyboard ch 1 → FM-1 track 1 → MidiPipe → D MINI ch 1.
Keep CH1 = 1 and IN = NOTES. The current per-track THRU works with this fixed map; the added synth parts use their own channel assignments on MIDI 4-7.
THRU forwards Note On/Off and velocity. CC, sustain and pitch bend are not forwarded. MIDI 4-7 assigns channels for added synth parts; THRU 4-7 controls their forwarding.